Posted on February 19, 2010 by Bahi Para
Categories: Blog
Posted on February 19, 2010 by Bahi Para
Categories: Blog
Here’s an article about backing up your work when you’re using Lightroom. It offers ten tips for backup, addressing common mistakes and misconceptions about what photographers should back up and how. It’s a long article but you can skim it very quickly and see if any of the headings tell you something new. If you have no inclination to read it but you think you should do something about making backups of your work, you can always call us.
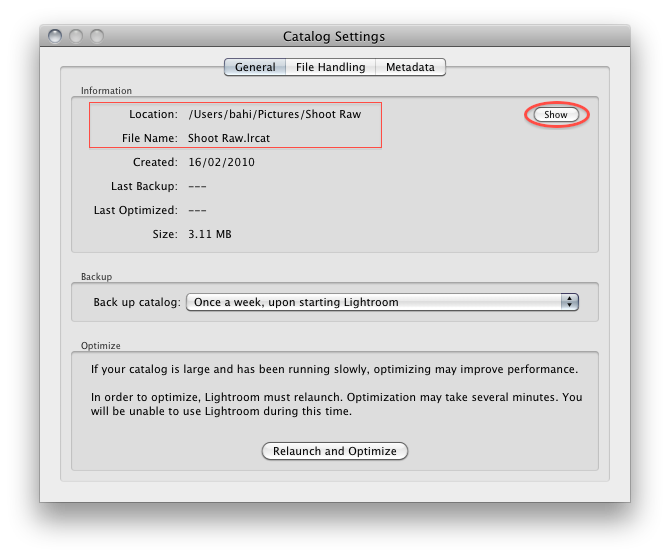
Lightroom maintains a collection of information called a catalogue. The catalogue tracks the names and locations of all the images you import into Lightroom together with the changes you make to those images. Brushes, gradients, keywords, ratings, crops, colour and contrast changes—everything you’ve done to every image in Lightroom is in that catalogue. The Lightroom catalogue has a filename that ends with .lrcat. Find the catalogue and make sure it’s being backed up. See screen shots below to learn how to identify your catalogue file.
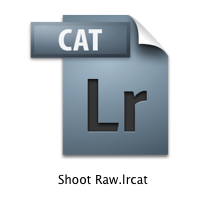
Above: the Lightroom catalogue icon as it appears in Mac OS X. This particular catalogue is called (fairly obviously) Shoot Raw.
Below: how to find the location and filename of your Lightroom catalogue after choosing Catalog Settings inside the Lightroom application. This example shows a brand new, empty Lightroom catalogue.
Lightroom doesn’t usually alter your original image files at all, whether you shoot raw, JPEG or TIFF. It uses the original files together with the changes recorded in the Lightroom catalogue to generate all its previews, prints and exports, including web galleries. So: back up both your catalogue and the image files that Lightroom sees.
This is an important point that many photographers miss when using Lightroom. If your backup software (something like Time Machine, if you’re on a Mac) backs up your data while you’re working in Lightroom, there’s a good chance that even if it manages to grab a version of that all-important Lightroom catalogue, what it gets might be useless when you need to restore it and you’re in a major, major panic. So make sure you run your backup software when Lightroom itself is not running.
If you keep your pictures and Lightroom catalogue on a Drobo or on a suitably configured RAID and you experience the failure of a hard drive, you can usually continue working without data loss. That’s very useful but on its own, it’s not a substitute for a proper backup plan. A backup plan is more likely to protect you against human error and software glitches.
Here are some examples. Let’s say you accidentally ask Lightroom to remove and delete some original raw files instead of the low-res JPEG versions that you once generated for client approval. Or imagine that your Lightroom database becomes damaged and refuses to open. Neither a RAID nor a Drobo will save you. You can’t go back in time and pull back an older version—if your Lightroom catalogue became corrupt yesterday, it’s the corrupt version that’s now safely duplicated across the RAID. There’s no guarantee that you can undelete the raw files you deleted, especially if you don’t discover your mistake for a fortnight. If you one day make a change to a complex, layered file in Photoshop and accidentally saved only the flattened version—how do you get last week’s version back to remove one of the changes?
RAID systems and Drobos help eliminate downtime by guarding against loss of data due to hard drive failure but they do not perform the same job as a backup plan. One is not a substitute for the other.
If you want to save a chunk of space on your backup drives and get faster backups, you can safely ask your backup software to ignore Lightroom previews and Adobe Camera Raw previews. (For my main Lightroom catalogue, the Lightroom previews are fairly modest in size and quantity but they still amount to tens of gigabytes—that’s a lot of backup space for a folder that changes daily and can be recreated at any time by Lightroom.)
Just find your Lightroom catalogue (see screen shots in step 1) and you’ll find the Lightroom previews sat right next to it. See the screen shot below for the icon. Its filename ends with .lrdata. When you’ve found it, tell your backup software to skip this item when backing up.
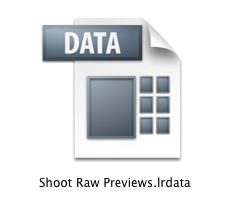
Above: the icon for Lightroom Previews. This file is created automatically by Lightroom, taking its name from the catalogue name that you choose. In this case, it takes the name Shoot Raw Previews.
Lightroom can back up its own catalogue file every so often. (Scroll back up to the picture of the Catalog Settings window and you’ll see how and where to activate this function.) The way it works is this: you launch Lightroom and it asks you whether you want to back up the catalogue. You look at the message and you say: no, I’m going to have to skip the backup this one time. Don’t you? Be honest—that’s what you do. You do it because you have work to do in Lightroom right now (that’s why you’re launching the application) and you can remember how long it took last time. You tell yourself that you’ll let it do the backup next time. We all do it.
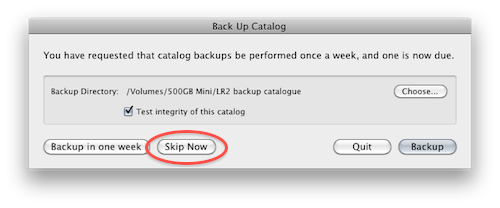
Above: the all-too-familiar prompt and the impossibly tempting Skip Now button
That’s not the only problem. Are you even backing up the catalogue to a separate volume? And when you’ve finished your marathon Lightroom session, the backup copy that you made before you began is already out of date. Lightroom 3 is going to address a couple of these issues by prompting you to back up when you quit the application instead of when you launch it but there’s more.
The catalogue doesn’t contain your images (see point 2) and is no good without them so you need to back those up separately. If you do that, you have to get the (possibly out-of-date) catalogue and the backup of your images in sync when it’s time to restore. And then there are the Lightroom presets you’ve created and any Lightroom plug-ins you’ve installed: are they getting backed up?
The solution is this: get your backup software to run regularly and automatically when Lightroom itself isn’t running. Get it to back up all your stuff, including your images and your Lightroom catalogue. Test it from time to time. Job done. Lightroom’s own backup is great when you’re working in the field with a laptop and some extra drives but it’s not intended to be a replacement for a backup plan.
If you don’t know what XMP sidecar files are, you’re not relying on them at all so feel free to scroll down to point 8.
You can ask Lightroom to automatically create and update files called XMP sidecars. The application will create an XMP file for each image that you have in your catalogue. Each XMP file lives right next to the image that it represents.
Each of these sidecars contains any ratings and labels you assigned the image, some metadata from the camera, the keywords you’ve entered and details of all your Lightroom work on that picture. You can send someone an original raw or JPEG file (not an export) together with its XMP sidecar from Lightroom; the lucky recipient will then be able to import the two things together and use Lightroom to see and modify all your adjustments—even the brushes and gradients. That’s useful. But if you rely on backing up these sidecars instead of backing up your Lightroom catalogue, you’ll find that when you start over in a new catalogue, you’ll have lost all of your Lightroom collections and collection sets.
There’s also a performance hit if you tell Lightroom to automatically generate and update these XMP sidecars all the time. Every time you make a change to a file, Lightroom needs to update its catalogue and the sidecars. Twice the work.
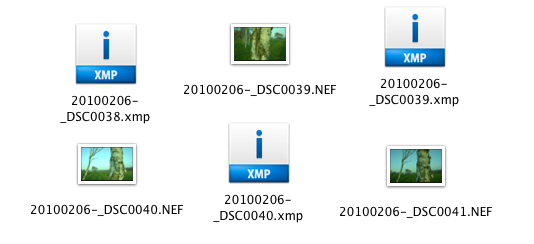
Above: image files in a folder with their XMP sidecar files next to them, one per image. These XMP files were generated on demand in Lightroom, not automatically. (Select the images in Lightroom, hit Command-S. Lightroom will write XMP sidecars for them.) That’s our recommendation—just generate them when you need them.
Many photographers will first test their backup schemes only when disaster has struck. That’s not the time to find out that your best work hasn’t been backed up at all or that your Lightroom catalogue can’t be restored. Check everything when the going’s good: restore your data to a spare volume and test that it’s valid and complete.
Personal note: I have seen automatic daily backup schemes that were missing all the important stuff on a drive—backups that were not getting a single thing of use in the event of a hard drive failure. (I am not making this up.) The only thing worse than not backing up at all is thinking that you are when in fact you’re not. Backup software today is much easier to use than it once was but don’t leave it to chance—check your backed up data by restoring it to a blank drive and using it. (After a successful test, delete the restored data!)
If you have a terabyte of data, start with at least 2TB of space on your backup drives. Leave plenty of room for expansion and archive. (See the note about the Drobo, below.)
A good single backup volume or RAID set next to your main machine will cover you in the event of hard drive failure but probably not fire, flood or theft, all of which might affect your backups as well. Keep a copy of your data off-site and update it every so often.
If you made it this far, well done. If you’re already doing all the stuff in the article, that’s even better. The biggest problem we see is that photographers either aren’t backing up at all or are not backing up what’s needed. Are you one of them? Don’ t be.
Drobo. A Drobo (from “data robot”) is a decent choice for a photographer to use as a backup storage device because it’s so easy to expand its volume as the device fills up. (That’s not a recommendation to keep your work on a Drobo—see point 4. The suggestion is that you keep your work where it is and back it up to a Drobo.)

Above: a five-bay Drobo S. This version has space for five drives and is quicker than its four-bay predecessor. The bottleneck was the Drobo’s internal CPU and design, which has been upgraded.
You can add hard drives to the Drobo and it will give you extra backup space without any reconfiguring and without needing to copy your old data across. You can keep working even if a hard drive fails (in the Drobo S, you can have two hard drives fail) or you can take one drive out and put a bigger drive in its place. You still lose no data and you don’t need to manually copy stuff across to the new drive—the Drobo sorts it all out. To calculate how much real, useable space you get when you add drives to the Drobo, use the appropriate capacity calculator on the Data Robotics site here.
If you’re thinking of buying a Drobo or two, read this first: data on the disks in a Drobo can only be read in a Drobo of that type. So if yours fails—if its power supply goes, for example—you can’t slide a drive out of it, put it into your Mac Pro and read useful data from it. For a backup device, that limitation is an acceptable price to pay for the convenience and scalability that you get in return but it’s one of the reasons we don’t recommend using a Drobo as primary, online storage unless you have another one as a backup. (Drobos are not unreliable—quite the opposite—but it’s important to be aware of that aspect of a Drobo’s design.)
If you’re a little stuck when it comes to this sort of stuff and you’re located in the UK, we can help. Call us on 020 3092 2907 or mail develop@shootraw.co.uk.
A new thing for us: a virtual store, powered by Amazon UK. We’ve put up a dedicated page about it. You can get to the store by clicking here. We’ve sold a few things already, much to our surprise. Thank you for your support—it’s very encouraging and we really appreciate it!
Posted on February 11, 2010 by Bahi Para
Categories: Blog
There aren’t many applications of the sort that we would use for a fast and powerful photographic workflow. You could argue that, for the approach we advocate and support at Shoot Raw, there are only two real players: Apple’s Aperture and Adobe’s Lightroom (or Adobe Photoshop Lightroom, to give it its full name).
The approach we take isn’t the only one. There are raw converters like Raw Photo Processor that aim to provide the highest resolution or the best sharpness (in the case of RPP, it succeeds admirably in those aims and it offers some integration with Lightroom to registered users—its user interface, though, is, shall we say brutally minimal); there are photo browsers (like Photo Mechanic) that aim to provide the fastest way to categorise your pictures and deal with metadata. But only Aperture and Lightroom aim to combine both the raw conversion and the digital asset management functions in one package and employ quick, friendly user interfaces and useful post-processing functionality.
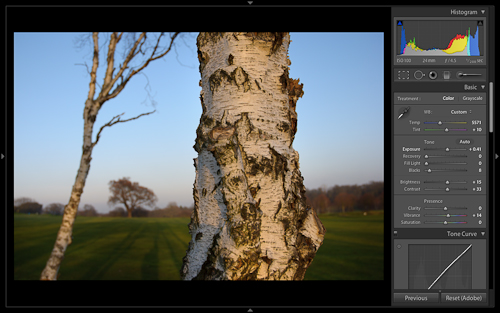
Above: Lightroom 2 screen shot, with develop controls exposed
When Apple released Aperture, Adobe had been working on Lightroom (Shadowland) for some time but didn’t have a product ready for release. Aperture’s initial success showed that a market did exist for this kind of application and Lightroom was released some time later, after a long public beta period. As of late 2009, photographers were overwhelmingly choosing Lightroom over Aperture on the Mac. (Aperture isn’t available on Windows but Lightroom, as you might expect, holds a commanding lead over other solutions that platform.) Figures from InfoTrends are fairly conclusive, as reported by John Nack here. (John Nack works for Adobe but the figures he’s reporting are independent.)
Both products have offered decent image quality for some time but both have also had their weaknesses. Many users are adamant that one or the other application is streets ahead for their particular camera; our experience has been that the default output Aperture 2.0 has been less blotchy and more pleasing at low light, high-ISO extremes but that Lightroom offered more control over the image and Lightroom 3 beta offers a stronger rendition throughout the ISO range. (It’s slow but we expect that to be addressed in the final release.) We haven’t yet tested specific new profiles offered for cameras like the Nikon D3 in Aperture 3, following complaints from some users of these cameras in Aperture 2.
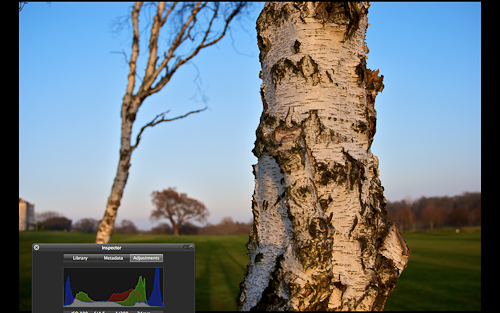
Above: Aperture 3 screen shot, with heads-up display (HUD) minimised.
One area where Lightroom has had a clear lead since version 2 is in its ability to allow non-destructive adjustments to parts of an image. Exposure compensation, brightness, contrast, saturation, clarity (“punch”) and sharpness can all be brushed in or out or applied using one or more gradients. Using the brushes and gradients is quick and easy, and they can be combined and applied one over another. These adjustments are referred to as local adjustments because they affect only parts of an image—you brush them over (or apply a gradient to) whichever areas need them. Best of all, they’re entirely non-destructive—you can revist them at any point and alter them or remove them without any need to convert your raw file to something like a TIFF (as was the case with Aperture 2).
Aperture 3 now includes similar brush functions to those used and loved by Lightroom users and closes what was probably the biggest gap between the two applications.
Lightroom 2 offers excellent sharpening for screen and print (using functionality from the highly regarded Photokit Sharpener plugin) for Photoshop. Aperture 3 offers soft proofing, using the ICC profile of your chosen printer/paper combination to give you a better idea of which areas of your image will cause a problem when you print, allowing you to deal with those problems, in advance, on screen. Both are useful functions and both applications will likely end up offering versions of them both. We don’t have any inside information but we expect Lightroom 3, due soon, to include soft proofing of some sort and retain its excellent print sharpening.
Aperture 3 allows you to include video and audio inside your Aperture database. Lightroom users can add some of this functionality by installing Jeffrey Friedl’s Video-Asset Management plugin but it would be nice to have it built in. There are also differences in the two applications’ approaches to managing mobile libraries, with Aperture leading the way.
This is an area where many photographers feel Apple has been lagging, though users of Nikon and Canon DSLRs in general won’t have had much to complain about. Adobe’s support for smaller and cheaper digital cameras that shoot raw has certainly been faster and more far reaching—for example, Aperture has just gained support for the Panasonic LX3 (released seven months ago) and still doesn’t offer support for the Panasonic GF1 (released five months ago), both supported in Lightroom for many months—but for our market of mostly professional DSLR users, it’s probably not a major concern and there are signs that Apple’s approach is improving.
One Lightroom strength (version 2.x onwards) is the existence of camera profiles that try to come close to the camera manufacturers’ profiles for popular cameras. That means that they attempt to give you the colour and the look of your manufacturer’s raw converters (e.g., Nikon’s Capture NX) or in-camera JPEGs. They’re pretty good— a clear improvement over Adobe’s standard profiles. In particular, many Nikon users will find the Camera Neutral profile within Lightroom 2 to their liking.
Mostly subjective—you need to download the trials and see how you get on with each application. I initially loved Aperture’s loupe effect but came to dislike it over time. (I no longer use it and just use a full-screen zoom.) Lightroom is what’s called a modal application, meaning that you switch between develop mode, view mode and so on using a keystroke. It becomes second nature when you’re used to it but it does irritate some new users. I loved Lightroom’s interface from the moment I used it—it seemed elegant, clean and simple and offered me the chance to customise its behaviour to my taste. Others have had exactly that reaction to Aperture.
[Update March 2010. We have an article with a little more detail about moving your library from one application to the other here.]
Both applications now support the import of XMP sidecar files (it’s new to Aperture). XMP sidecar files hold information about the file’s metadata so you’d expect that to mean that ratings and keywords would travel between Aperture and Lightroom if you decide to move your library permanently from one to another. As of February 2010, however, that only works when moving from Aperture to Lightroom. Aperture doesn’t read image ratings when importing, even though it clearly writes those same ratings to its own XMP sidecar files when told to. (See the Apple knowledge base article on this issue here.)
Your image edits do not survive the journey in either direction so your non-destructive post-processing work will be lost if you migrate from Lightroom to Aperture or vice versa unless you’re prepared to bake in your changes by exporting TIFFs or JPEGs. (That’s a significant step—make sure you hang on to your raw files and move those across as well, if you choose to migrate TIFFs or JPEGs.)
It’s a very strong upgrade for existing users and also a strong offering for new users but most of the switchers are likely to be people who prefer Aperture’s interface. There are lots of aspects we haven’t discussed above, including great book-publishing options, for one, and publishing options with custom book publishers. All this should seem like good news for Lightroom users—a lacklustre or half-hearted Aperture release at this stage would have left Lightroom with little or no competition in this area and the product would have been more likely to stagnate. Now that Aperture 3 has non-destructive brush adjustments and some other improvements, the game is back on. Aperture 3 should prove to be a good enough product to stop the general move from Aperture to Lightroom and put some pressure back on Adobe to continue innovating.
In brief: Faces, in its current Aperture 3 and iPhoto incarnations, is unlikely to win over many pro photographers or serious amateurs. It’s a great idea that will one day be genuinely useful. Places is another thing altogether: if you have a GPS unit with your DSLR or use an independent unit like a Garmin, this is can be a real time saver.
We expect excellent noise reduction (both colour and luminance) and probably soft proofing, though this feature didn’t make an appearance in the beta version. We also expect the much improved, more detailed rendering in the Lightroom 3 beta to make it through to the final product in some form. It will retain its excellent output sharpening, gain much improved local sharpening controls (which are a little weak in Lightroom 2) and probably one or two surprises. (These are personal opinions—we have no link to Adobe or Apple—but we’re quite confident about them.)
If you have a large library in either application, you’re probably best sticking with it for the moment. Both offer free trials so you can import all or part of your existing image library into the competing app and compare output quality, speed, interface and functionality. Run them in parallel for a month. With the release of version 3, Apple has shown clearly that the Aperture project is alive and kicking and perhaps the momentum that the Aperture team has gained recently will carry through to an early, class-leading version 4. If you’re starting out, you now have a genuine choice again between competitive applications—something that couldn’t have been said a week ago.
We’re certainly looking at the product with renewed interest—that wasn’t the case with Aperture 2, after a short testing period. We welcome your thoughts and we’ll keep you posted.
Will there be raw converters on the iPad device? I’d guess so, eventually. And which raw converter is most likely to make is likely to make it to the iPad first? Well, that’s easy…:-)
The Aperture 3 trial (for UK users) is here. Apple will mail you a download link and a serial number that’s good for 30 days.
The LIghtroom 3 public beta (free, expires April 2010) is here.
The Lightroom 2 trial is here.
Here are our Amazon UK links—all Amazon prices include VAT.
Aperture 3 upgrade from Aperture 2 (requires an Intel Mac and Leopard or Snow Leopard):
Lightroom 2, full version for Mac OS X or Windows:
For Lightroom users upgrading from version 1 to version 2 (OS X or Windows):
Amazon isn’t allowing affiliates to link to the full version of Aperture 3 yet (not sure why) but you can find it here.
Aperture 3 is also available at the Apple UK retail store.
If you have questions about Lightroom, Aperture or raw workflow in general, drop us a line and if we can, we’ll turn the answer into a new blog entry.
Posted on January 27, 2010 by Bahi Para
Categories: Blog
Adobe Lightroom 3 beta offers many refinements and some new features over Lightroom 2. One of the most intriguing is a control labelled Edge Detail. The slider is intended to deal with the smearing of colour that you sometimes see in very high-ISO shots, when noise reduction has reduced the sharpness of edges and the colour might leak from one part of the image into another.
Here’s a very mundane picture. It wasn’t taken at very high ISO (just 500) but was pushed to about ISO 2,000 equivalent during post-processing and was taken on an older camera that has a very noisy sensor by today’s standards. (As a point of reference, any of you shooting the new Nikon D3S would probably need to go to ISO 25,000 or 50,000 to get anything quite this noisy.)
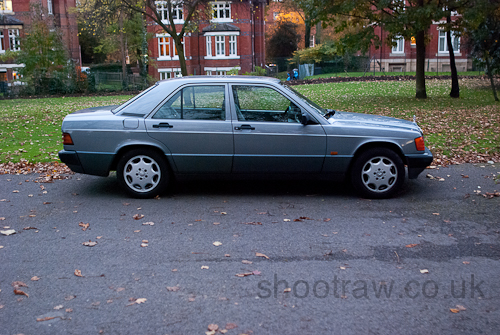
Now take a look at a detail from the image, first with the new Edge Detail slider set to zero and then, in the second crop, with the slider set to 100. Look at the way the edges of the orange indicator lamp are defined against the car’s bodywork.


You can see the effect of Edge Detail quite clearly—it appears to be adding sharpness and clarity to the colour edges, emphasising colour boundaries in a way that regular sharpening doesn’t and getting rid of much of the orange mush that you can see in the top picture. (In Lightroom, regular sharpening acts only on the luminance data—i.e., the brightness—and not on the colour. That’s intended to prevent colour shifts.)
Digital photography allows us to work in very low light but the level of colour noise reduction going on often smudges the colour; Edge Detail has been designed to counter that where it matters and can be quite effective—it just needs a better name.
Although this slider is a feature of the beta version of Lightroom and could change (or even disappear) before the final release, it might be worth an early look if you’re an event photographer shooting with only ambient light and sometimes end up working in some challenging, low-light conditions. If the Edge Detail feature makes it through to final release, you’ll also see it in the corresponding version of Adobe Camera Raw (ACR) for Photoshop, which is rumoured to be ACR 6.
In case you were wondering, our training is not this geeky—it’s about workflow rather than esoteric details! We put this stuff in the blog so we don’t have to spend as much time covering it in regular courses. If you find this kind of thing useful or interesting and know others who might, we’d love it if you could pass on details of our site.