Posted on March 23, 2010 by Bahi Para
Categories: Blog
Posted on March 23, 2010 by Bahi Para
Categories: Blog
[Update: that was quick! Lightroom 3 public beta 2 is out and it looks good. Luminance noise reduction that—at first glance—seems to work extremely well and an easier way to switch between the old raw conversion engine and the new. I’ll leave the rest of this post intact but it’s now outdated, less than an hour after it was posted as a pointer to a rumour.]
The free Lightroom 3 public beta was released in 2009 and was a big hit, particularly among low-light shooters, but the beta is due to expire at the end of April. Could it be that there’s a new version on the way before the final release? Take a look at this thread at the (usually very useful) Lightroom forum over at the Luminous Landscape. Apparently, there was an announcement that even made it to DP Review before being pulled. Perhaps by the time you read this, it’ll actually be out. This is the Adobe page to check.
If there is another public beta on its way and if it offers a peek at the new luminance noise reduction that Adobe has been working on, it will be very welcome. We’re keen to see how the luminance NR compares with third-part solutions like Noiseware, Noise Ninja, Topaz Denoise and Neat Image.
Posted on March 18, 2010 by Bahi Para
Categories: Blog
Almost all DSLRs come with plenty of options governing aspects of image quality. They almost all affect JPEG output but which of those settings and options matter when you shoot raw? We’ll look at this briefly in this article and in more detail later.
The exposure of a given scene will be determined by these settings:
(The ISO setting in digital photography is not entirely straightforward and will perhaps get its own article. For now, we’re keeping things simple.)
As you’d expect, aperture, shutter speed and ISO setting all make a difference to the images that your camera records, whether you shoot raw or JPEG.
A DSLR’s menu system will offer control over other aspects of your image, whether you’ve told it you’re shooting raw or JPEG:
Sometimes you’ll see picture controls that change many secondary settings together. For example, your camera might offer an option like “Vivid”, which sets saturation higher and might also affect contrast and/or colour mode. These controls might also change the way colour appears, including small shifts in hue, sometimes emulating certain types of film.
Which of these secondary settings, if any, affect your raw files? Which of them should you be concerned about when shooting raw? And, again assuming you shoot raw, do they affect any other aspect of your photography.
Before answering them and explaining the answers, let’s categorise everything inside a raw file as being one of two things.
Simplifying somewhat, everything inside a raw file is either a measurement of the light falling on a part of the sensor or it’s a note about camera settings. You could say that it’s either data (the values for light on the sensor) or metadata.
Let’s say that you take a shot on a current 24-megapixel DSLR. Inside the resulting raw file will be roughly 24 million values representing the light that fell on the sensor during the exposure, one value for each sensor element, or sensel. We can consider all this stuff to be the data that’s eventually turned into an image in your raw converter.
The metadata is a record of things like the shutter speed you used, the aperture, the type of camera, the type of lens you used, the white balance and sharpness settings, which saturation you’d specified and so on. Lots and lots of stuff, only some of it documented publicly by the camera manufacturer.
So which of the secondary settings listed above directly affect the data in your raw file?
The answer is: not a single one. Think of there being a note in the raw file that says: this photograph was shot with sharpness set to high and contrast to minimum, noise reduction set to zero and colour space set to Adobe RGB 1998; colour temperature was 5500K and the green-magenta bias was 30% magenta. Most raw converters, including Lightroom and Aperture, read the note and display large parts of your metadata but the only thing they use to influence their initial versions of your images is the white balance information. Everything else—including all the other secondary settings listed above—is ignored. Even the white balance setting is used only for the initial rendering.
Despite the presence of the metadata “note” inside your raw file, none of the 24 million values recorded by your 24-megapixel camera to represent the scene itself were directly affected by those secondary settings.
When you shoot JPEG, things are very different; each and every secondary setting above has a chance to affect each and every pixel of the JPEG. In the case of white balance or contrast, it is almost guaranteed to affect every pixel, often in a way that might limit the changes you can cleanly make later. That doesn’t mean JPEGs are bad or unusable, particularly if you’re in complete control of your light and white balance—it just means that the raw converter inside your camera is making decisions that it might be best to leave for later.
Although the secondary settings have no direct effect on the raw file, they do affect the histograms you see on the back of the camera. As a photographer, you might use those histograms to change the exposure settings (shutter speed, aperture, ISO) that you choose, perhaps as a result of exposure compensation that you dial in. The story isn’t over. We’ll revisit this topic soon.
And speaking of data and metadata…
You can get all future articles by e-mail or RSS (both are free) and you can call us on 0333 577 5703 to book your own Lightroom course or to book a support visit. Visit the main blog page here. Have fun shooting!
Posted on March 16, 2010 by Bahi Para
Categories: Blog

Update 12th April 2010: the price of Elements is now back to normal. The offer lasted till 11th April 2010 so over three weeks in total. Still very good value but the prices mentioned below are no longer available from Amazon directly . The article will stay up since it provides some detail on using Elements with Lightroom.
First, our apologies to the regular Photoshop users among you and to those of you outside Europe. You can skip the rest of this note.
We don’t plan to do this sort of thing often but we received e-mail today from Amazon UK mentioning that it is now listing Photoshop Elements 8 at less than £50 as of 16 March 2010. That price includes VAT and shipping. This is the boxed, retail DVD and by UK standards, that price is an absolute bargain. (US readers who are still reading will raise their eyebrows at that description but sadly, it’s true.) The list price is £75 and it routinely sells on Amazon for £65.
It comes as a Mac version (Intel processor only) or a Windows version
and both are currently at the same price.
Compared with most of the newer image editors intended for casual and occasional use, Elements wins hands down. It now offers layers, full Adobe Camera Raw compatibility, adjustment layers, and layer masks (for adjustment layers). It even offers smart sharpening and a version of the context-aware scaling function that you find in the full Photoshop (attempting to keep people and buildings in proportion while you stretch the image).
Photoshop Elements will suit you if you don’t need to do much retouching outside Lightroom or Aperture but do need to clone out a stray object or element or if you need to run third-party noise-reduction plugins or something else requiring Photoshop. It will also suit you if you previously outsourced most of your own post-processing (or provided your clients and editors with images that weren’t retouched) and are only now beginning to do more of it yourself. It’s an excellent, low-cost way of beginning your Photoshop journey.
For occasional use, Elements 8 has only three significant weaknesses compared with Photoshop 11 (CS4).
(It’s also not a 64-bit application but neither is the full Mac version of Photoshop CS4.) Both LAB mode and the ability to work at 16-bit depth are useful but for many people who do most of their work (including local adjustments) in a raw converter like Lightroom or Aperture, these things might matter less than they once did.
LAB mode in Photoshop is very powerful but relatively few people use it today, particularly after recent additions to Photoshop’s functionality, offering the “fade to luminosity” function. (That’s not to say LAB isn’t useful, powerful or under-rated—it’s all those things and fans of LAB mode will be horrified, of course, to read all this. It’s just relatively unusual to see people actually use it today, now that editing in RGB is as powerful and capable as it now is.)
You’d convert to CMYK if you’re preparing press-ready work (for magazine or book adverts, say). Again, you’ll already know if you need it. If you ask nicely, many publications’ prepress folks will do the conversion from RGB to CMYK themselves if you provide them with tagged files that you produced in a colour managed workflow.
Working in 16-bit mode, particularly in a larger colour space like Adobe RGB (all things we will discuss in future articles) is a way to help preserve smoothness of tone and colour, among other things. It will help avoid banding and other colour artefacts. The banding and other issues are mostly likely to appear when you do lots of work to the contrast, saturation and exposure of part or all of an image, particularly in areas of the image the show smooth surfaces
If you have used Lightroom, Aperture or another raw converter to do most of the grunt-work, like exposure compensation, highlight recovery, tone, white balance, contrast, dodging and burning) on a raw file, you’ve done most the things that would cause problems with 8-bit files. Performing some further minor work (some cloning or healing in small areas) on an 8-bit file is not usually something to worry about.
In addition, if you’d like to use Photoshop to run a noise-reduction plug-in like Neat Image or Topaz Denoise, the plugin will usually work in 16-bit mode in Elements 8. If you intend to use layers to blend the post-NR image with the regular image, you need to convert down to 8 bits so the conversion after you’ve run the noise-reduction routine to minimise the effect. (Elements 8 opens and saves 16-bit TIFFs—it’s just that layers and some of its own built-in filters and functions don’t work in that mode. Luckily, the third-party NR plugins work fine.)

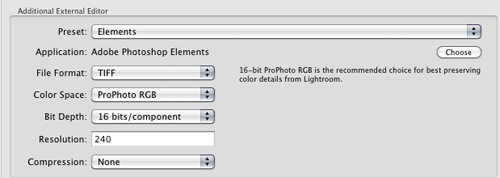
Above: setting up Lightroom to work with Elements 8 for work that will remain in 16-bit throughout.
Lightroom integration with Photoshop CS4 is deeper than with other image editors like Elements. However, Elements offers most of what you need: in Lightroom’s preferences, perform a one-time setup. You specify that Elements 8 is your image editor, you tell Lightroom which colour space to use when creating an export file and which format to and bit depth to work at. Once you’ve set it up once, you’ll have a keyboard shortcut (for example, command-option-E or ctrl-alt-E) to invoke Elements but you can also right-click an image inside Lightroom and edit in Elements that way. Because it’s set up, the bit depth, file type and colour space will be taken care of automatically after that.
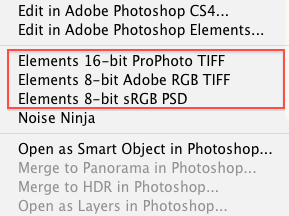
Lightroom also allows you to set up Elements 8 in different ways (16-bit TIFF, ProPhoto, 8-bit TIFF sRGB) so that you get a choice of options for each image that you send to Elements: you would choose the most appropriate for the task at hand.

Above: examples of what you might see when you right-click an image in Lightroom having set up different ways of sending an image to Elements 8.
If you do work that requires you to shift to 8-bit mode, first switch to a smaller colour space. (ProPhoto RGB is not a sensible choice for 8-bit work. More on colour spaces another time.)
What you don’t get with Elements 8, compared with CS4, is the smart objects integration, the HDR-from-raw-files integration and the ability to create panoramas from your raw shots.
If you were using Photoshop Elements to run a noise-reduction filter like Neat Image or Topaz Denoise, you’d choose to work with 16-bit TIFFs in something like Adobe RGB space. Lightroom will create a TIFF that contains all your existing Lightroom edits and will send it to Elements. When you finish and save your work in Elements, you’ll see the edited file in Lightroom, next to the original. Lightroom will handle the 16-bit TIFF as it would any other file, allowing you to export JPEGs, print, etc.
We own and use both CS4 and Elements 8 (for which we paid a good deal more than £49!) here at Shoot Raw, just to make sure we keep up-to-date with both. We can recommend Elements 8 for photographers who don’t spend a huge amount of time doing advanced Photoshop work or for people beginning with Photoshop, who’d like to get familiar with the application.
One more thing: if you were to buy Elements at £49 and then upgrade to Photoshop CS4 today at the Adobe UK site, you’d end up saving £30 over the cost of just buying CS4 outright from Adobe. Though it’s impossible to say this with absolute certainty, that saving is likely to continue when CS5 is released.
Amazon UK is marking this is “for a limited time only”. No idea how long it’ll last. We’ll try to update or delete this note when the offer has gone.
We earn commission from Amazon UK if you click one of the links and check out and pay for a product within that shopping session. That’s nice but the commission (about £2.50 per copy of Elements that you pay for during your visit to Amazon from our links) clearly isn’t reason enough to plug the product. We’re recommending it because it’s good (as long as you understand its limitations—see above), because the sub-£50 price is an absolute bargain and because Amazon UK is a reputable seller. (On which subject, we’d recommend that you buy directly from Amazon rather than one of its resellers—look for “Dispatched from and sold by Amazon.co.uk “.)
The Mac version:
Below: the Windows version
We’re going to start a series of articles looking at exactly which camera settings affect the data in your raw files when you work with Lightroom and how. We’ll be looking at the primary exposure controls—shutter speed, aperture, ISO—and secondary camera settings like saturation, sharpness, contrast and colour mode (meaning options like Adobe RGB and sRGB). Over the series, we’ll be giving you definitive answers and explaining the technical language.
If you were sent a link to this post, you can subscribe by e-mail or RSS to receive all future articles in full. It’s free.